Touchscreen laptops are easy to use. Touch provides faster navigation and optimizes your computer for touch-oriented features and applications.
The touchscreen is the default feature on touchscreen laptops and 2-in-1 tablets. But what if you want to turn off the touchscreen and use other input methods? Could it be that your PC’s touchscreen is unstable or defective? You can turn off the touchscreen until you find a solution.
Turn Off the Touch Screen on the Dell Laptop:
Although laptops vary in brand and design, the steps for turning off the touchscreen on all Windows devices are the same. It doesn’t matter if your computer belongs to HP, Lenovo, Dell, or Acer. The methods described in this tutorial will work great on your device.
You can turn off the laptop touchscreen using three system tools built into the Windows operating system: Device Manager, Windows Registry, and Powershell. We’ll show you how to use these tools to turn off the touchscreen on your laptop.
Also Read: Hack WIFI Password
Also Read: How To Access Another Laptop From My Laptop
Turn Off the Touch Screen from the Registry Editor:
The Windows registry stores important configuration files and settings for your computer’s hardware and software. You can turn off your PC’s touchscreen by creating an “emergency switch” that turns off touch input in the registry.
This may sound a bit technical, but it’s easy. Also, this method comes in handy if the Device Manager on your PC is not working as expected.
Before showing you the steps, we strongly recommend backing up your registry or creating a system restore point. Deleting or corrupting any registry file can damage the Windows operating system and render some system programs unusable.
If something goes wrong when you turn off the touchscreen, a backup can restore missing or damaged files and fix registry errors.
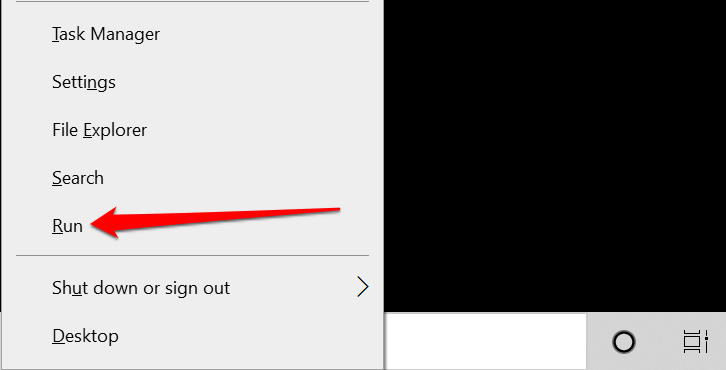
Press Windows Key + R to open the Windows Run dialog box. Alternatively, right-click the start menu icon and select Run from the shortcut menu.
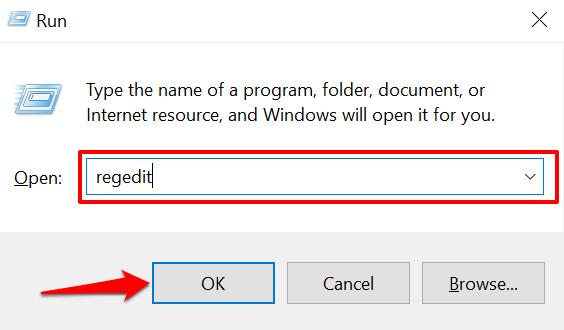
Type Regedit in the dialog’s search box and press Enter or click on OK.
Paste Computer HKEY_CURRENT_USER Software Microsoft Wisp Touch into the address bar of the registry editor and press Enter.

To create an emergency switch, right-click a space in the Touch folder, select New, and select DWORD (32-bit) Value.

Give a new name to the new registry value TouchGate and press Enter.

Double-click TouchGate, set the Value Date to 0, and click OK.

Then restart your laptop for the changes to take effect.

To re-enable touch on your PC from the Windows registry, go to Computer HKEY_CURRENT_USER Software Microsoft Wisp Touch, double-click TouchGate, set the Value date to 1, and select OK.
Then, restart your computer to restore the touch screen function.
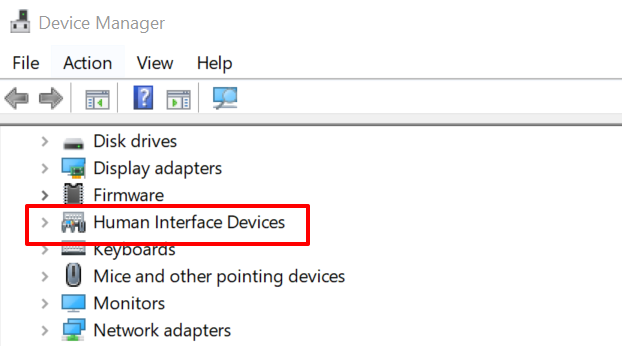
Turn Off the Touch Screen via Device Manager:
Device Manager is a system application that allows you to manage hardware components on your Windows PC. You can turn off your PC’s touch screen by disabling the touch driver.
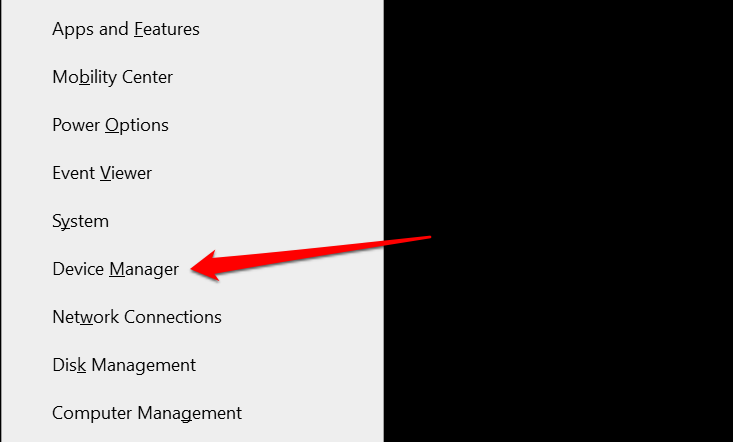
Press Windows + X or right-click the Start menu icon and select Device Manager from the shortcut menu.
Expand the Human Interface Devices category.
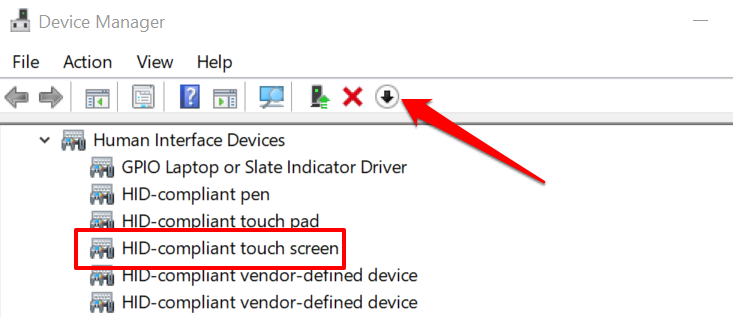
Press right-click the HID-compliant touch screen and then click on Disable Device.

Select a driver and click the black down arrow icon in the toolbar.
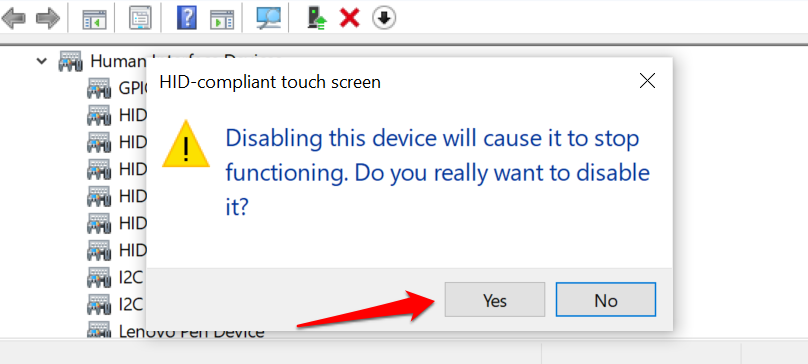
Select Yes at the confirmation prompt to turn off the computer’s touchscreen.
If more than one touchscreen device is listed under Human Interface Devices, deactivate all of them and check if that turns off your PC’s touchscreen.
To re-enable the touchscreen in Device Manager, select touchscreen drivers and tap the green up arrow in the toolbar.
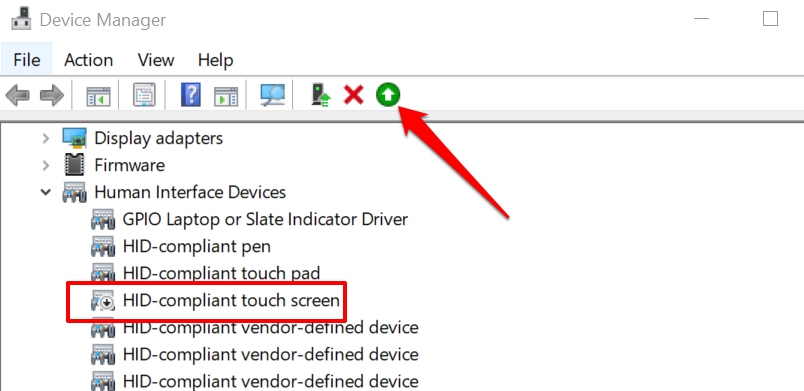
You can also press right-click on the driver and select Enable Device.

Turning off the laptop touchscreen is not recommended if the display is the only input method. This is because you cannot re-enable the touchscreen. Therefore, make sure you have other input devices (external keyboard or mouse) close at hand before turning off your computer’s touchscreen.
Turn Off the Touch Screen via Windows Powershell:
Windows Powershell is another powerful tool to change your computer’s hardware.
Right-click the Start button, or press Windows Key + X and select Windows PowerShell (Admin).

If you cannot find “Windows Powershell (Admin)” in the shortcut menu, enter PowerShell in the Windows search bar and select “Run as administrator” in the search results.

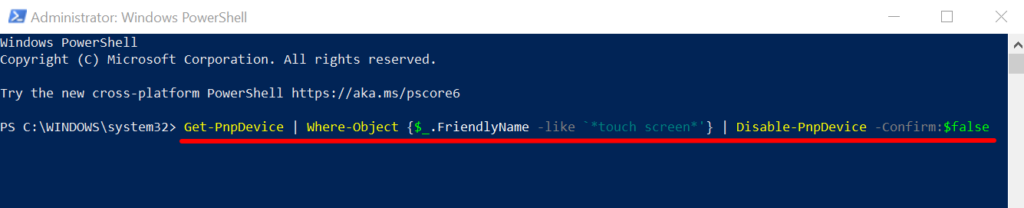
Paste the below command into the Powershell terminal and press Enter.
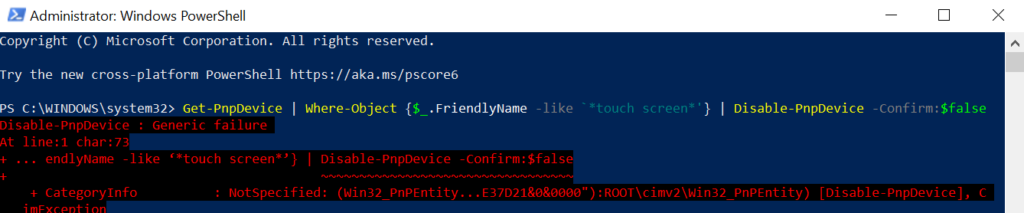
Get-PnpDevice | Where-Object {$ _. FriendlyName -like ‘* touch screen * ’} | Disable-PnpDevice -Confirm: $ false
PowerShell may display an error (like in the image below) when running the command. Ignore the error message. Despite this error message, our test devices (HP and Lenovo laptops) no longer detected touch input.
To re-enable the touchscreen via PowerShell, paste the below command into a terminal and press Enter.
Get-PnpDevice | Where-Object {$ _. FriendlyName -like ‘* touch screen * ’} | Enable-UPnp Device -Confirm: $ false

Again, PowerShell may display a different error message. Ignore the error and touch the computer screen. It should be responsive to handle input without any problem. Otherwise, try the command again and restart your computer.
Also Read: Compatible Upgrade For Dell Inspiron 3505 & Repair Cost
Also Read: How To Play PUBG In Laptop or PC
Conclusion:
These are currently the accepted methods of turning off touchscreen input on Windows computers. You don’t have to use all the techniques; you can do the job. Make sure you follow the instructions above. Then restart your computer and back up your files if necessary.


Popular Post
- How To Set Password On Your Laptop
- What Can You Plug Into An Hdmi Port On A Laptop
- What Is A Graphic Card
- Refurbished Laptops In Kolkata Dell Hp Lenovo Acer Asus Macbook
- How To Check And Delete Incognito Mode History
- Should I Buy Laptop Online Or Offline
- How Can I Increase My Laptop Speed
- Refurbished Laptops Price In Indore Hp Dell Lenovo Acer Asus Macbook
- Folder With Question Mark On Macbook Air
- How To Reset Dell Laptop Windows 10
Categories
NSS Laptop Service by Location
Popular Services
- MacBook Battery Replacement Cost
- HP Printer Repair in Delhi NCR
- Dell Laptop Repair
- HP Laptop Repair
- Samsung Laptop Repair
- Lenovo Laptop Repair
- MacBook Repair
- Acer Laptop Repair
- Sony Vaio Laptop Repair
- Microsoft Surface Repair
- Asus Laptop Repair
- MSI Laptop Repair
- Fujitsu Laptop Repair
- Toshiba Laptop Repair
- HP Printer Repair Pune
- Microsoft Surface Battery Replacement
- Microsoft Surface Screen Replacement


