How do you change your computer or laptop password in Windows?
In this world of internet-based devices, many people are falling into the traps of identity theft, account theft, social media account hacking, and many more. All these happen because we trust many of our fellow people living or working on our side without any unique precautionary methods. On the contrary, some are proven crooks who can fool us by taking advantage of our USER IDs and passwords, especially computer passwords and other sensitive and crucial datasets.
Moreover, these crucial and confidential types of info cannot be shared at any cost because they can cause monetary losses at various levels. To avoid such incidents, one must ensure multiple levels of computer passwords or set passwords at several places on computers.
This article will highlight some essential points for setting up varied computer passwords at many levels and the steps to confirm computer passwords. Moreover, the key issues that one should ponder are:
Also Read: How Do I Fix Disk 100 in Windows 10 Task Manager
Also Read: How to install Microsoft big new Windows 11 update is out now
How to change a computer password?
A brief methodology is applied to learn how to change the computer password on my computer with the help of the following easy-to-do steps:
- Together, press the Ctrl + Alt + Delete keys at the same time on the keyboard of your computer system or laptop.
- Select the option 'Change Password' appearing on the screen shown.
- Here, a dialog box will pop up with 'Change Password.' You need to enter your current password and the desired password you want to change two times.
- You should always note that the password should carry one uppercase, one lowercase digit, and a unique character. Apart from all, it should be at least 8 characters long; an excess of 8 characters would be divine, but it should meet the minimum password length requirements.
- Now, you need to click the Arrow button next to the last password slot, which will change your password accordingly.
- Lastly, you need to Log Out/Sign Out of the computer or laptop and log back in again to verify that your last changed password algorithm has taken place.
Also Read: How to Stop System Data Usage in Windows 10
Also Read: How to Clear Cache in Windows 10 Using Run
How to change the password on Windows 7?
It is so easy to process the change of Windows 7 passwords in less than a minute. A user needs to follow the below-mentioned steps to know how to change their password on Windows 7, or we have seen people asking for how to change the password on Windows 7 and to change user password Windows 7 sincerely:
- Just click the 'Start' button once in the bottom left corner.
- Here, it would be best to type the word 'Password.'
- Here, you need to click once on the "Change your Windows password" option shown on the prompted dropdown list.
- Now, click the "Change your password" option on your screen.
- You need to enter your old password for the computer along with the new password twice on the net that emerged now.
- Congratulations! You have successfully changed your Windows 7 passwords. Now you also know the passwords on my computer that you change afterward, too!
From the steps mentioned above, have you encountered the steps to know how to put a password? Now, it is time for you to understand the actions regarding modifying passwords on Windows 7 in the following lines.
Also Read: What is Windows 10 Activation Error 0x803F7001: 3 Easy Solutions To fix it completely.
Also Read: How to fix Windows Activation Error 0x8007232b: 6 Solutions To Obtain the Error.
How to remove passwords from Windows 7?
Some people don't have enough time to handle computer passwords so nicely; hence, they always use their laptops password-free. Here, we have delivered some dedicated steps by which you can understand the process of how to remove passwords from Windows 7 in the below-mentioned steps:
- Initially, you must simultaneously click the "Windows + R" keys to open the Run window.
- You must enter "Control Userpasswords2" by pressing the Enter key.
- There might be several users that you have created on the computer. In this case, you must click on the user whose password you want to remove, then click on the "Reset Password" button at the bottom of the dialog box.
- Here, you will have the option to create a new password, but since we don't want to have any laptop passwords, you need to click 'OK.'
- Kudos! You have removed the password from a Windows 7 PC or laptop.
Also Read: How to Enable Secure Boot on Windows 11 PC or Laptop
How to get into a computer without the password Windows 7 on your computer?
If a Windows user is locked out of her computer, how will she get into her computer without the password on Windows 7? In this case, we have mentioned some dedicated steps to let you understand the process nicely:
- Firstly, you need to push the power button and hold it till a screen comes on the monitor where Windows 7 starts booting up.
- Once the computer gets started, it will come to a screen with the name "Windows Error Recovery" with two options beneath:
- Launch Startup Repair (Recommended)
- Start Windows Normally.
- It would be best to hit the first option, "Launch Startup Repair (Recommended)," and push the enter button. From here, it will go to the 'Startup Repair' screen, which will try to boot something that would take around 8 to 10 minutes relatively, depending upon the speed of your computer system.
- Here, the computer will ask you to select from two options such as below:
- Send information about this problem (recommended)
- Don't send
However, you are not required to select either of them. Instead, click on the little triangle below to open a dropdown list with details.
- Here, you will see two links at the bottom of that screen; you need to click on the bottom, which will automatically open up a notepad with some details.
- What will you need to do now? It would be best to put the cursor on the leftmost option, 'File,' which will open some options for you.
- Here, you must click on 'Open,' which will take you to a new screen to open some files on the same computer.
- It would be best if you double-clicked on 'Computer' and hit the Local Disk (C) that can be present with some other name like Windows 7 (C). You need to click on the same for the next screen.
- Go to the 'Windows' Folder by double-clicking on the same.
- Before going to the following folder, you must change the second slot named File Type to 'All Files' from "Text Documents (* txt)."
- Now, we need to go to the folder' System 32' and double-click it.
- After coming to the next screen, you need to scroll down to the screen where you will see the file icons instead of folders. Here, you need to scroll hard using the scroller on the right side of the file with the name 'etc.'
- On 'etc.,' you need to double-click the file where it will ask you to change the file's name; you will change the file's name to 'sethc7' and press enter for the following process. You may add any character or digit to change the file name. However, I just added the number '7' to the file.
- Now, we need to hard scroll up the file list to the file 'cmd.' You must copy and paste this file at the bottom of this shown list using the mouse. We need to rename this file as the previous one before changing the file name to 'sketch' and hitting the Enter key afterward.
- Here, we need to cross or close the two pop-ups opened to the screen where you opened the bottom link. You must also minimize or complete that section by clicking the downside triangle.
- Now, click on the option "Don't Send," as mentioned in point 4 above, and click 'Finish."
- The system will automatically shut off after clicking the 'Finish' option. You need to start the system afresh and let it boot up.
- Click the Shift Critical 5 Tito to open the "Command Prompt."
- This will push the command prompt to open the 'sethc.exe' file, where you must.
- 'net user," only if you find the number of accounts the computer has and wish to traverse those accounts one by one.
- If you know the account you want to bypass, type "net user *." This will push the command prompt to show you and ask you to create a password. Here, you may change the password for each account or remove passwords from Windows 7 for every performance.
- Here, you get options: either you create a new password that will not show on the screen due to security reasons, or else you may go and leave it blank to delete the password that was there before (only if you don't want any password for the concerning account).
- It will ask you to re-type your password in the preferred slot.
- You may leave it blank and hit Enter if you want no password.
- You may enter the password you choose in the preferred security mode (the password will not show on the screen).
- It will say that you changed the password as "The command completed successfully."
- After this option, you will get a chance to write another command; you may choose the same option described in point 19 (b) to change the passwords for other accounts.." else, you need to type 'exit' and then hit Enter key for escaping the; you and prompt screen successfully.
- Just click the right arrow key after the password input slot, and otherwise, automatically log into the comp the user without escapeessfully the password. Or else you should change the password that you have changed in the command prompt option.
These steps were described for the users who continuously ask, "How do you log into the computer without a password?" How to Download and Update Acer Drivers Online in Windows 10 / 11 PC or Laptop
How to add a user to Windows HowFdosyou try: we should understand why we need a separate account when our main or administrator account is fully activated and working nicely. It is for the guest user or kids in the family who can genuinely use the computer system or laptop without downloading any file or application or cannot make any significant change to the computer.
Get to know threonine and sincere steps to understand the methodology to know how to add users in Windows 7 mentioned below:
- Go to the start significant and write the computer panel there.
- Once the control panel is opened, select "c"ange account type" "below "u" er accounts."Here, you need to select "manage" another account," and"on the next available screen, you need to click on the "Crea"e a new account" that" will take you to a screen where y" you will be required to put concerning details of, the new account. First, the latest version is the name of the new account. w which account. After you fulfill the word of the required performance, you need to choose a category for the new account as to which type of account it will be. I.e., standard or administrator. As you all know, a standard version does not require making notable changes to the performance or downloading any fresh computer.
- You may also make the new account password-protected after going into the history and making necessary changes, like changing the display picture, setting up parental control, deleting the report, and password-protecting the options in the leftmost series of choices. These 7 passwords help safeguard any unauthorized person from accessing and gathering crucial information falling into the wrong hands.
- Kudos! You have successfully created or added a new user 7.
Also read: How do you enable Wfrom to access Draggatheringreature?
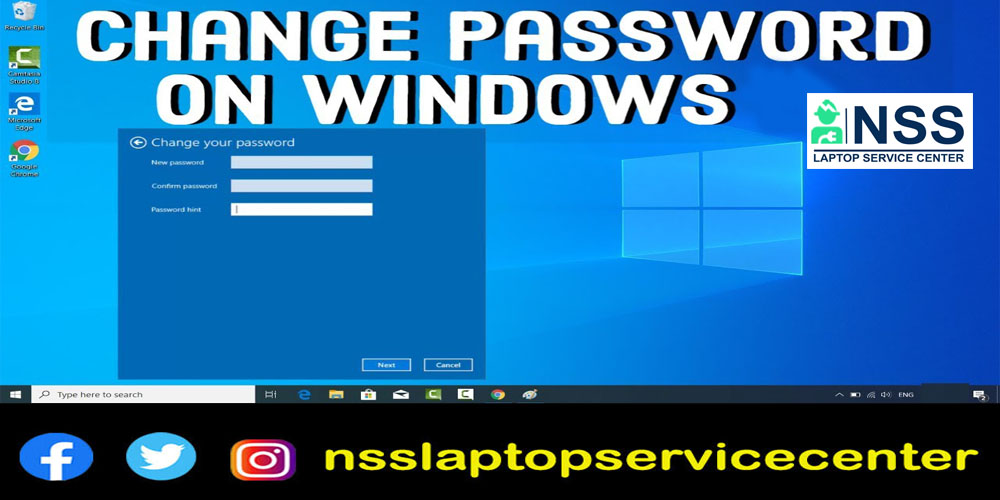
How do you change the password to Windows 10?
Many people get puzzled while searching for the dedicated steps to know how to change the computer password to Windows 10. In the steps below, we hMany people got crucial steps duly needed to change login password window 10 hassle-free.
Moreover, there are two simple methods by which one can easily change the login password in Windows 10, described below in the easy-to-understand Windows in a simple language wherein. Lastly, dows 10 asks for a password that you would give in:
Method 1
- Gin Windowhe start menu and write 'password' in easy-to-understand it will automatically prompt.
"ChanLastlyoass,word". - Select the option"n "Change your password "rd" and click on it "to open the required "options ahead.
- Here, you will see a screen with the named options". Under."his screen, "you will see an "option with the name 'Password.' Click on this option once.' Iopportu'itiesopen a box slot with a button in the extreme bottom-."right corner as 'Change.' Click on this 'Channam'dow, you wi.' be able to see a text bar with the name ahead 'Currwithre you need to put in the exact password that you are u.'ng currently and click on the 'Next' option on the right of the screen.
- On this screen, you will see 3 empty text slots with the names:
- New passwordirm password
- Password hint
- You need to fill in all three options and select the button 'Next' in the bottom right corner beside 'Cancel.'
- Congratulations! You have successfully changed your login password on the Windows 1erating system.
Method 2
- Simultaneously press the "Ctrl + Alt+ Del" kebesidether.
- On.' you press all the three keys toge" her, you will s"e 5 options in a search is one below another.
- You must select the 4th option with the name "Change a password" by clicking it.
- You will redirected to the screen" where you will see the 3 empty text slots with the nummus:
- Old password
- New password
- Confirm password
- Here, you must precisely fill in the three empty text slots with the password details you want to update in your computer system or laptop. Click must precisely fill the head of the last text option "Confirm
- Now, the computer will prompt you that "Your password has been changed." be" ow the option "C" and a password."
- h! Your password is now"changed, ed in the concerns." Wind"ws 10 operating system."Users must also "know how to change their computer password on the diverse set."Ch engines to understand the tail mentioned above. With these simple, easy steps, one can now nicely use this information password to Windows 10.
Also Read: How to Enable Sesteps mentioned11 PC or Laptop.
How do you put a password on a file?
There is a vast need for cyber security as there is a bulk of potential hackers roaming everywhere to hunt for their next prey for creating a source of easy income through the database of their crucial and sensitive collection of information like banking credentials, User IDs & Passwords, Client database, customer database, payment information, and many more.
In addition, one can nicely put a password to a folder carrying some critical files so that no unwanted person can access and see the crucial and sensitive data inside those files. The steps by which you can put a passwcriticalfile could be anything such as an image, text file, pdf file, an audio file, data side the folder, where you want to create a password-protected folder, you just required to the right,t-click with the mouse, and then click new and select, the 'Texfollowsument.'
- Once you have opened the text document, double-click on the required to change the file name' and then click. For instance, write 'ame 'Fold.' Locked' and hit the Enter key afterward.
- Now, it is in ".txt" mode. Double-click this document's name, and you are ready to write this.
- When the file 'is ready to be written, you need to paste the co"tent" and double-click this document to open the document required to make a short & crisp change to it. You must require your chosen password at the sp "YOUR-PASSWORD" in Box 1. Forex, for example, takes NSS@1 as a password followed by the Enter key.
Note: You are required to put a space before and after your password in the concerned slot.
- No", we need to "go to the leftmost option on the upper side of this document with the name 'Fild need to select the option 'Save As.' It will bring you to the screen where you can change the file name and format you want to save.
- As we have already 'hang'd the file name to .'olderLocke'', it will show with the name 'FolderLocked.txt.' You file naming the extension of the file want to batch file with the extension name '.bat' resulting in the word 'F,'derLocked.'at'.
- After changing the extension .' of the file, all you need to do is type" the option to "All files" from "Text Do, documents (*.txt)" and click on 'Save.'
- Now, you may close the notepad, which you may delete later (only if you wish).
- After coming out of the notepad," you will see" that there"is a batch" file "that has already been c"eaten before the notepad file with the name 'FolderLocked.bat.'
- Here, you need to double-click the batch file once which batch file already.
- Inside this 'Private' folder, you need to transfer all. The files that' you need to make 'are password-protected. Once you complete the automatic step, you have two visibility: the 'Private' folder and the batch file.'Now, you need to click that '.bat' file, which will open, and ask, "Are you sure to lock this folder? (Y/N)". Answering with capital 'Y''followe' would be best by the enter key.
- Once you do that, your 'Private' folder will go hidden. Now you must go through the"ugh putting the password through the ba" file.
- For checking, you need to click the '.b't' file and enter the password 'NSS@1' to enter into the 'P'ivate' folder.
- After successfully entering the password, the Private folder will automatically emerge in front of your screen alongside the '.bat' file.
- For' again locking the file,' you are not required to repeat the cycle described in Point 12 of these steps and answer the question with capital Y, which will hide the Private folder in front of your screen.
- Congratulations! You have successfully created a hidden folder for yourself without using any external app or paid services.
Multiple persons want to know the same concerns about how to password-protect a folder on Windows 10. This would be the suggested answer for all of them.
|
@ECHO OFF if EXIST "Control Panel. {21EC2020-3AEA-1069-A2DD-08002B30309D}" goto UNLOCK If not EXIST, Private go MDPrivate : CONFIRM echo Are you sure to lock this folder? (Y/N) set/p "cho=>" if %cho%==Y goto LOCK if"%cho%==y goto LOCK if %cho%==n goto END if %cho%==N "oto END echo Invalid choice. goto CONFIRM : LOCK ren Private "Control Panel. {21EC2020-3AEA-1069-A2DD-08002B30309D}" attrib +h +s "Control Panel.{21EC2020-3AEA-1069-A2DD-08002B30309D}" echo Folder locked goto End : UNLOCK echo Enter the password to Unlock Your S" cure Folder set/p "pass=>" if NOT %pass%== YOUR-PASS"ORD goto FAIL attrib -h -s "Control Panel. {21EC2020-3AEA-1069-A2DD-08002B30309D}" ren "Control Panel. {21EC2020-3AEA-1069-A2DD-08002B30309D}" Private echo Folder Unlocked successfully goto End : FAIL echo Invalid password got" end : MDPrivate MD Private echo Private created successful"y goto End : End |
I hope you have got the relevant information for which you have come up here. If you cannot do the things mentioned in the above blog, call our expert technician by dialing our hotline mobile number at 9717150098 or using the NSS Laptop Service Center to gather more info. Share this blog with your friends and family, and share the knowledge with everyone else.
Frequently Asked Questions


Popular Post
- How Can I Upgrade My Laptop Processor
- Tricks Tips To Recovery Bios Problems From Laptop
- Asus Laptop Fan Repair Replacement Cost
- How To Fix 0xc000007B Error In Window
- What's The Best Laptop Repairing Center In Kolkata Quora
- Linkedin Download For Windows 11
- How To Replace The Backlight Lamp Ccfl
- MacBook Air Vs MacBook Pro Which Is Better For You
- Apple MacBook Fan Repair Replacement Cost
- What To Do When The Laptop Hangs
Categories
NSS Laptop Service by Location
Popular Services
- MacBook Battery Replacement Cost
- HP Printer Repair in Delhi NCR
- Dell Laptop Repair
- HP Laptop Repair
- Samsung Laptop Repair
- Lenovo Laptop Repair
- MacBook Repair
- Acer Laptop Repair
- Sony Vaio Laptop Repair
- Microsoft Surface Repair
- Asus Laptop Repair
- MSI Laptop Repair
- Fujitsu Laptop Repair
- Toshiba Laptop Repair
- HP Printer Repair Pune
- Microsoft Surface Battery Replacement
- Microsoft Surface Screen Replacement


